Photogrammetry requires an object to have a lot of surface features. For this reason, plastic and metal objects almost always need some kind of preparation (see the scan gallery for many examples). My normal workflow includes spraying the object with scanning or chalk spray and creating a very fine layer of thousands of sprinkles. Unfortunately, scanning spray only comes in the color white and chalk spray with a different color tends to leave some stain after washing/removing.
A few days ago, there was an interesting post on /r/photogrammetry by user /u/factrans demonstrating the use of UV-phosphorescent liquid to spray the object. The spray seems to be mostly invisible under normal lighting, but glows brightly under UV.
Since I already had the two necessary components lying around, I had to give this idea a try. First, I just swapped four of the ring lights LEDs with their UV counterparts. Next, I filled a tiny amount of UV powder (<0.1g) into a small Ziploc bag. (Hope local authorities don't get confused here..). I then placed the object into the bag and shook it in order to fully cover the figurine with powder.

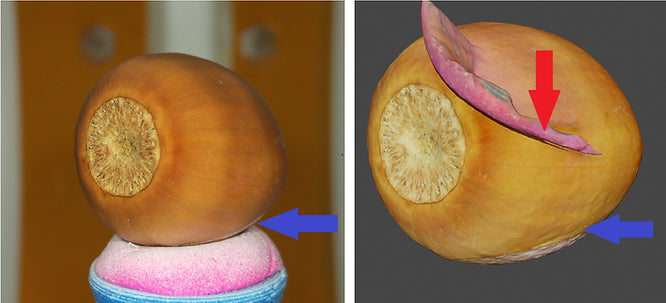
The most difficult part was finding a suitable scan object. I tried various 3d printed figurines light to dark gray, but the powder is quite visible even under normal light.
Even after intense cleaning, it was still visible in both UV and normal light (see above).
I finally settled on a white printed duplicate of a local sculpture.

The white lion would be impossible to be scanned with photogrammetry, as there are almost no clearly identifiable features on the surface. I assume, that even structured light scanners would have quite a hard time, as the material PLA is quite translucent causing a lot of sub surface scattering (which is a story for another time).
BUT turning on the UV LEDs revealed many visible features created by the powder. I created an image set of 120 photos with the OpenScan Mini and uploaded it to the OpenScanCloud. Processing took less than 3 minutes and returned the following result:

The arrow marks an area, where you can clearly see the used printing layer height of 0.2mm. Even though this is not my best 3d scan ever, you can see a lot of printing artifacts too.

Here you can see a sticker with a thickness of 0.08mm, which I use to label the kind of material + brand.
Summary
Using phosphorescence to create additional features for photogrammetry is an interesting approach and might be useful in some cases. This was a fun little experiment and I will definitely revisit this procedure in the future. It might be worth looking into alternatives to the UV powder, and maybe try IR phosphorescent materials as well. One more note, apparently PLA is not translucent to UV light and thus my polarizer did not work/could not be used with the UV LEDs.
But the main challenge remains: how to create temporary and fully removable features on pale objects without using any solvents?!
L̶e̶t̶ ̶m̶e̶ ̶k̶n̶o̶w̶ ̶i̶f̶ ̶y̶o̶u̶ ̶a̶r̶e̶ ̶i̶n̶t̶e̶r̶e̶s̶t̶e̶d̶ ̶i̶n̶ ̶a̶ ̶U̶V̶ ̶v̶e̶r̶s̶i̶o̶n̶ ̶o̶f̶ ̶t̶h̶e̶ ̶r̶i̶n̶g̶ ̶l̶i̶g̶h̶t̶,̶ ̶w̶h̶i̶c̶h̶ ̶h̶a̶s̶ ̶t̶w̶o̶ ̶m̶o̶d̶e̶s̶,̶ ̶U̶V̶ ̶a̶n̶d̶ ̶n̶o̶r̶m̶a̶l̶.̶( Not possible due to IP issues)


Leave a comment
This site is protected by hCaptcha and the hCaptcha Privacy Policy and Terms of Service apply.