TLDR: I improved the setup and got myself some highly accurate steel spheres with nominal diameter of 20 and 25 mm ± 0.0025mm. I used the OpenScan Mini to scan a scene with both spheres, scaled it using a reference measurement from one sphere, and analyzed the diameter and surface deviation of the second one. I reliably get a diameter of ~20±0.03mm as well as a surface deviation within 2σ = 0.03mm
I knew that my latest post claiming a bold 0.008mm accuracy made a very click-baity claim, but it triggered enough professionals, so that I got a lot of feedback and valuable input. Thanks to all those people, sharing their knowledge. This is a great help to improve this project!
And even more thanks goes to those people supporting the project with donations through Patreon. I probably couldn't face my wife, after spending >100€ on some steel balls, so thank you for making this kind of experiments possible! :)
The setup: Chrome Alloy Steel spheres

Sample image showing the illumination and surface preparation
- two spheres of 20 and 25mm diameter (claimed accuracy within 0.0025mm)
- using the OpenScan Mini with Polarizer module (cross polarization setup)
- covered the scene in a thin layer of Aesub Orange self-vanishing 3D Scanning spray
- took 150 photos per set (--> 230-250MB total data) and a total
- capture process takes 11 mins per set
- a total of 8 sets within two days (temperature within 20°C ± 2K)
- processing was done using the OpenScanCloud and took 6-8 mins per set
Just let me know if you want to check the raw image data or resulting raw/scaled 3d models, and I will happily share all files.
The scaling procedure (using free Autodesk Meshmixer)

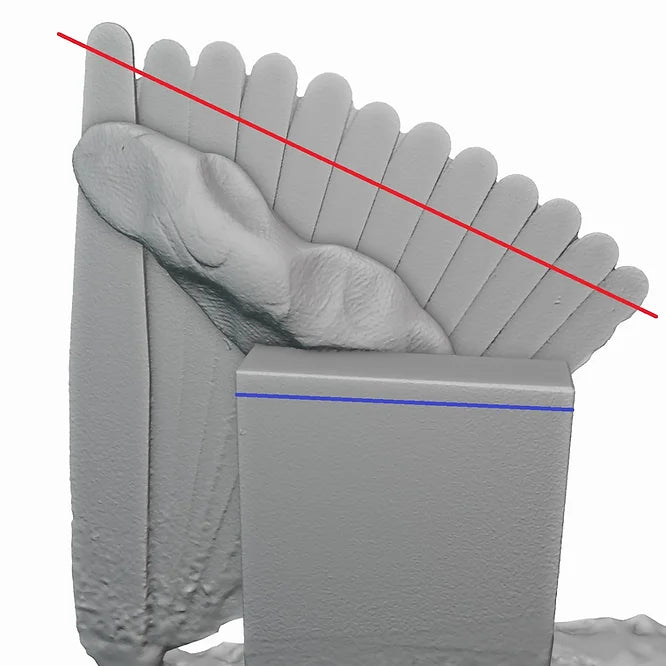
Measuring the diameter of the sphere to calculate the scaling factor in Meshmixer
I can not repeat this point enough: Photogrammetry models naturally come without any information about scale. But it is absolutely possible to scale the model accurately with various methods:
- include markers in the scene with known distance
- know the camera positions and parameters
- include an object with known dimensions
Unfortunately, the first two options are not implemented in the OpenScanCloud yet (but would work with different software packages).
For this reason, I used the 25 mm sphere to take 5 measurements and calculate the mean. See the image above, where the raw scan shows a diameter of ~ 0.3128mm (--> scaling factor: 79.923). I used the measuring tool in "Analyse --> Measure" (select the type and direct as shown in the image). I scribble over the surface of the sphere and collect several values and calculate the scaling factor.
Scaling was done in Meshmixer too ("Edit --> Transform --> Scale XYZ").
I understand, that this method is not perfect and introduces quite a bit of uncertainty, but from a practical point of view, it just works fine. And we shall see in the results of this post, if scaling can be done reliably...

Getting the scaling factor for each dataset using five measurements
Unfortunately, this blog just lets me post images and videos (no tables), so let me know if you are interested in the raw Excel sheet containing all the measured and derived values ;)
Mesh analysis using GOM inspect

Selecting an area in GOM inspect and auto-fitting a sphere
I selected ~ 60-80% of the scanned sphere's surface and used "construct --> sphere --> auto-sphere" to create the best fitting sphere. I repeated this procedure for both spheres and all eight datasets.

Measured Radius and surface deviation (sigma) from ideal sphere
Results and Discussion
For the radius, I measured:
The surface deviation of the sphere lie within:
I know, that one could do much more with those numbers, but I am fine with that result.
Note, that there are definitely some shortcomings in my methods:
- The scaling seems to be slightly off, since all measured values are below the expected values. This is probably caused in my tool choice in Meshmixer.
- I just realized how my former math "skills" got really rusty over the years of non-use, so please excuse my mistakes and let me know what to improve!
- I did not get the spheres calibrated in a certified lab due to the high cost for a piece of paper
- ...
Hmmm, I am still not really able to make a valid accuracy-statement for the scanner. Maybe someone can help me with a good and not so click-baity formulation!
And let me know what else I could try with this (or other 3d scanners)


1 comment
Gabriel Kenji
Hello, my Friend! How are you? Firstly, I would like to thank you for your content! I’m a true fan of your work, secondly, I’m sorry my English isn’t that good so there may be sentences that don’t make sense!
I’m a dental surgeon and I’m in my master’s degree here in Brazil! and I want to develop a protocol and a homemade scanner that can be used in dental clinics and be used more frequently by dentists, since the cost of having a 3D scanner here in Brazil is very expensive, I wanted to check the possibility of doing a partnership with you to share knowledge and even have a solid partnership here in Brazil for studies and perhaps the production of a more precise model for more refined work! I’m waiting for a response! a good week!
I also have WhatsApp if you think it’s better to talk!
Leave a comment
This site is protected by hCaptcha and the hCaptcha Privacy Policy and Terms of Service apply.